Boosting your Wi-Fi performance
To get you started, we've listed some tips up based on which router you've got at home. You'll either have one of our Wi-Fi Hubs or an eero. Our powerful hubs are ready for streaming the latest box set or your gaming marton - have a read of our tips to getting the best from your Wi-Fi.
Wi-Fi Hub 2
Here's our top tips for getting the most out of your Wi-Fi Hub 2.
If you've received a Wi-Fi Hub, have a look at our setup guide to help you switch over from your previous router.
The location of your router is critical as your router needs room to breathe. Keeping your router on a flat, open surface (ideally halfway between the ceiling and floor) and facing out into the room will give you the best results. You also need to keep your router powered on to ensure it receives essential updates to continue performing at its peak.
Placing your router in a confined space like a cupboard or behind furniture will block the signal from getting where it needs to be. Similarly, keeping it away from other large electricals (TVs, microwaves, etc.) may further improve its performance. You may not have much choice over your Wi-Fi Hub's location based on where your fibre connection box is — experiment with a few locations if the length of your Ethernet and power supply cables allow.
It's become the norm to quickly connect to your router via a wireless connection. We don't blame you — it's become really effortless to get your devices hooked up quickly and easily! However, for those really heavy-duty jobs, a wired connection will allow for superior performance.
Connecting devices to your router directly via an Ethernet cable will allow you to get to top speed without worrying about signals getting crossed. Setting up with a wired connection will depend on your home setup — if your router and fibre connection box are far away from your device(s), you will need to buy longer Ethernet cables to facilitate this, and you may need to invest in a Network Switch if you want to connect multiple devices to the same router.
Your broadband speed is shared amongst all connected devices. If everyone in your household is using the internet at the same time, you may get slower speeds. Downloading, streaming, video calling, gaming and other online activities that use a lot of bandwidth may also take a toll on your speed if you're doing them all at the same time.
The larger your house, the less likely it is that you’ll get a strong Wi-Fi signal in every room. If you can, try to have your router in as central a location as possible to give the best chance of getting signal throughout your home. If you're struggling to get your Wi-Fi signal to stretch far enough, it might be worth taking a look at a Wi-Fi Booster. This system uses multiple devices to create a network, ensuring that your wireless signal can stretch as far as necessary to cover the entire footprint of your home. You'll see the most benefit with this upgrade if your house is spread over several (3 or more) floors, or if you need the signal to travel longer distances (for example, into the garden or if your home footprint is wider).
Wi-Fi Hub 3
We want you to get online quickly, so here’s your simple guide to setting up your Wi-Fi Hub 3. If you have an engineer coming they’ll take care of the set-up for you. If you’re setting up yourself, follow this step-by-step guide to get your full fibre service up and running. You'll also find some helpful tips to get the most out of your Wi-Fi Hub 3 further down the page.
If you have taken digital voice with your package, you can find everything you need to get your phone service connected below.
Take a moment to familiarise yourself with your Wi-Fi Hub 3, this will help you to set it up.

The way you set up your Wi-Fi Hub depends on which Fibre Connection Box you have. This small box is where the fibre comes into your home. It plugs into your Wi-Fi Hub to connect your full fibre. It may already be installed and fixed to a wall somewhere in your property, or if you have an engineer coming they’ll install this for you.
Depending on your Fibre Connection Box at home we have details on how to set everything up.

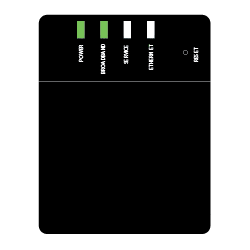
White Fibre Connection Box
Wi-Fi Hub 3 Setup instructions (White Fibre Connection Box)
-
Your engineer will plug the power cable into the POWER port on the bottom of the fibre connection box and into the wall socket, then switch it on.
-
The POWER and PON light on the fibre connection box will turn solid green.
- Now take your Wi-Fi Hub power cable and slide the plug into the slot on the power adaptor.
- Plug the power cable into your Wi-Fi Hub and wall socket. Then switch on the wall socket and push the power button on the back of the Wi-Fi Hub.
- Plug one end of the Ethernet cable into PORT 1 on the bottom of the fibre connection box.
- Plug the other end into the WAN port on the back of your Wi-Fi Hub.
- The PORT 1 light on the fibre connection box will turn solid green.
- The light on the front of your Wi-Fi Hub will turn white when it’s on and connected. You’re now ready to enjoy full fibre.
Black Fibre Connection Box
Wi-Fi Hub 3 Setup instructions (Black Fibre Connection Box)
- Your engineer will plug the power cable into the black port on the bottom of the fibre connection box and into the wall socket, then switch it on.
- The POWER light on the fibre connection box will turn solid green.
- Now take your Wi-Fi Hub power cable and slide the plug into the slot on the power adapter.
- Now plug the power cable into your Wi-Fi Hub and wall socket. Then push the power button on the back of the Wi-Fi Hub.
- Plug one end of the Ethernet cable into the yellow Ethernet port on the bottom of the fibre connection box.
- Plug the other end into the WAN port on the back of your Wi-Fi Hub.
- The POWER, BROADBAND and SERVICE light on the fibre connection box will turn solid green.
- The light on the front of your Wi-Fi Hub will turn white when it’s on and connected. You’re now ready to enjoy full fibre.
If you’ve added Digital Voice to your package, getting set up is a doddle. Just unplug your existing telephone cable from the master socket and connect it to the green port on the back of your Wi-Fi Hub. Digital Voice will go live at the same time as your new full fibre service. If you've previously used a microfilter, this doesn’t need to be connected to the Wi-Fi Hub when connecting your phone.
Please note, if your landline phone is approx. 25+ years old, you might find it will not ring when using Digital Voice. To fix this, simply plug in a microfilter between the phone plug and the green VOIP port on your Wi-Fi 3 Hub.

| Light colour and action | Status description |
|---|---|
| All lights off | There is no power to your fibre connection box |
| Flashing green light | Switched and connecting |
| Solid green light | Connected |
| Amber light | Starting up / updating (black fibre box only) |
| Red light | Fault |
Depending on design, a solid blue or white light may be present when the Wi-Fi Hub 3 is connected to the internet.
| Light colour and action | Status Description |
|---|---|
| Blinking amber | Starting up to connecting to the fibre connection box |
| Blinking amber and white/blue | Connecting to the internet |
| Solid white/blue | You're connected to the internet |
| Solid amber | Failed to connect to the internet. If the light stays solid amber for more than 15 minutes, please contact us |
The first time your Wi-Fi Hub is set up, it might take a few minutes. If the solid white light doesn’t come on, please contact us.
Eero
Here's our top tips for getting the most out of your eero. If you need more information, our eero Hub page contains more articles to help you achieve Total Home Wi-Fi.
If you've received an eero, have a look at our setup guide to help you switch over from your previous router. Setup is quick and easy, and you can even keep your current Wi-Fi network name and password to ensure all your existing devices stay connected even after you've switched your router over. If you have multiple eeros, make sure you set them up in the same room initially so that they connect to each other and establish a network immediately.
The location of your eero is critical as your router needs room to breathe. Keeping your eero on a flat, open surface (ideally halfway between the ceiling and floor) and facing out into the room will give you the best results. You also need to keep your eero powered on, to ensure it receives essential updates to continue performing at its peak.
Placing your eero in a confined space like a cupboard or behind furniture will block the signal from getting where it needs to be. Similarly, keeping it away from other large electricals (TVs, microwaves, etc.) may further improve its performance. You may not have much choice over your eero's location based on where your fibre connection box is — experiment with a few locations if the length of your Ethernet and power supply cables allow.
The fewer obstacles surrounding your eero, the better. We’re talking televisions, microwaves, ovens, cordless phones, other large electronic devices, and even dense objects like a boiler or fish tank. All of these can interfere with your connection to varying degrees.
You might also find that the materials used to build your home like brick, plaster, cement, stone, metal and double-glazed glass can block some of the signals. Some newer homes may even have plasterboard walls that are backed with aluminium foil, which can act as a barrier to Wi-Fi. The best thing to do is experiment with the position of your eero, if possible — moving the eero to an alternative location with less blockages might be more beneficial.
If you're using multiple eeros, the mesh system they create pushes Wi-Fi into every corner, blanketing your home so you can move around with fewer drop offs. If you want to know more, we've got more information on our Total Home Wi-Fi page .
Keeping your eeros in talking distance will help in spreading a strong Wi-Fi signal evenly throughout your home. Try to keep your routers within 50 feet of each other so they can keep in touch and help improve the spread of signal into weaker areas of your home. Do feel free to spread them over different floors to cover any spots where the signal isn't getting to as easily.